Search This Blog

Tuesday, September 21, 2010

Snow Skin moon cake with red bean paste

I was inconsolable. This is my snow skin moon cake debut but I totally messed up. I am just glad I tried this before Mid Autumn Festival so that I can try again.

My first batch of snow skin moon cakes was really forgettable. I had every thing right esp. the taste except for the shape of the end product. In fact, I will need hints as to what it is myself had I not been its maker.

The problem was unshaped red bean paste ( too gooey to start with ) and wrong method of wrapping ( I did it the curry puff way, boo hoo ! ). The nail that sealed the coffin was that the moon cake was too fat for the mould. I am still wondering how to 'process' these horrible batch of knobbly moon cakes ; to eat or to throw.

Before starting on anything else, note that everyone's mould is different.  So, work out the ratio of  snow skin to paste filling before shaping. Also, the filling was be made into a ball first before it is wrapped !

How much dough and how much paste filling :

Prepare the dough first. Get some and fill the cavity of the mould.
Measure.
The ratio of dough to paste filling is 1 part  : 2 parts.

Here's the maths for my little pink mould ( Phoon Huat, pink, 4 patterns, $ 3.90 )
The dough that filled the mould cavity is 42 g.
So, to make a moon cake that fits the mould, you will need 14g dough and 28 g paste filling.

A word of credit; I have to thank hubby for reworking on the red bean paste to make it drier and  more manageabl. He looked like a wizard stirring the vat of red bean over the stove :-)
 Also , thanks to thebakerswhocook at blogspot for unraveling some of the mysteries of moon cake baking.

Adapted from thebakerwhocooks.

Skin :

70 Hong Kong Flour (steam for 15 min , covered. Leave to cool. Sift twice )
70 cooked glutinous rice flour or koufen
105 g icing sugar
1/2  tablespoon shortening ( I used Ghee )
5  tablespoons cold water* ( approx )
1 T Hong Kong Flour (mix with 1 T hot water to form hot dough.  Use a fork and stir in a bowl. )

Filling
Red bean paste, rolled into little balls. oil hands to make this easier.

Method
Sieve glutinous flour , Hong Kong flour, icing sugar. Add shortening, rub until crumbles form.
Add cold water, stirring constantly with a  fork. Knead.
Add hot dough. Knead until combined dough is smooth ( I added purple coloring to make streaks at this stage )
Rest 10 min in the fridge.

Tick tock, tick tock …

Measure out dough. Dust work surface with koufen.
Flatten to disc, edges thinner than center.
Put filling at the center of disc.
Gather edges of dough , just like how the Dimsum master does to his  Xiaolongbao, to wrap filling.
Pinch to seal edges.
Dust smooth surface with koufen or HK  flour.
Press into mould, dusted side on mould.
Knock out cake from mould, catching with your hand.
Brush off excess flour gently.

 Chill until firm. Serve. Keeps for 4 days.

Verdict : I did the first batch with only koufen for skin, which is very fragrant but too brittle to handle. This concoction ( koufen + HK flour ) is not as fragrant but pliable, which means the skin can be made very very thin without tearing. For a blind test, pure koufen skin actually tastes better.

Pictures : coming up..

Saturday, September 18, 2010

Seafood Okonomiyaki

"What's for lunch?" is H's greetings recently whenever school's out. 9 months of canteen lunches ( economical rice, soup noodles ) has got H excited about lunch at home.

Exam session is coming. School activities is winding slowly to a close, which means H will be home for more lunches in the coming weeks. I am all geared up to whip up something both of us enjoy so that we can share a happy lunch together.

Under the magic carpet recipe folder of my Microsoft Onenote , there is a list of dishes I hope will make her lunch day. Okonomiyaki, rosti, spanish omelet. ..

First on my list : Seafood Okonomiyaki.

The zucchini takes a while to prepare, so the idea is to salt and leech the zucchini while you do other chores. Other than that, all that is needed is a strong wrist for flipping the frying pan over the plate. I skip the mayo and sauce sauce combo to cut back on the fat. The okonomiyaki , chock-a-block with prawns, crab stick ( or maybe the occasional unagi slices ) and crunchy vegetables , satisfies the food pyramid to a T.

Use 1/3 cup ( the rice cup type ) of flour per person. If you like it chewier, add a tablespoon of atta ( wholemeal ) flour on top of the self raising flour.

A one dish meal for 2 :

1/2 cup prawns, shelled and deveined
1/2 cup crab sticks, cut to bite size
1/2 head very small cabbage, cut to bite size
1/2 zucchini , quartered and sliced thinly, skin left intact
1 egg
2/3 ( rice cup ) cup self raising flour
Depending on the wetness of your vegetables, about 1/3 (rice cup ) cup water

Sprinkle salt on zucchini to leech out juice. Leave for 1 hour. Wash and squeeze dry.

Together with cabbage, microwave for 1 minutes. This rids cabbage of 'veggie' smell. Drain. Cool for further use.

Mix flour,egg,water,prawn,crab sticks.
Add vegetables.
Season very lightly if you intend to serve with mayonaise / bbq sauce.

Side 1 :
Heat 8 inch pan. Oil lightly, sides of pan included. I use garlic oil for extra kick.
Pour mixture when pan is very hot. Fry on high for 2 minutes. Reduce to medium heat.
Fry for another 5 minutes. Shake pan so that okonomiyaki can slide about.
Cover pan with plate.flip pan over plate to reveal crispy side.
If you follow the procedure correctly, the uncooked side is now on the plate surface.

Side 2:
Oil pan again. Increase heat.
Slide uncooked side of okonomiya back to pan.
Again,
Fry on high for 2 minutes.
Reduce to medium heat.
Fry for another 5 minutes. Shake pan so that okonomiyaki can slide about.
Okonomiyaki's ready.


Serve straight from the pan, garnish with bonito, mayonaise and bbq sauce if so wish.

Goes well with some cold beer and your favorite Korean/Japanese drama ( I recommend BoysOverFlowers, my favorite K-drama ). Enjoy!

Pear Kimchi


The doctor has repeatedly told me not to take any more fermented cabbage due to my sensitive gut. What should I do when Korean fever strikes and kimchi is very much on my mind the entire week ? Instant kimchi, of course!

I bet any self respecting Korean will be shocked at this, but still, I am happy to get my kimchi fix, even if this is not the real thing.

I make this with the help of the microwave, an indispensable tool in my kitchen. Practically whatever microbes that may be found was nuked and yes, I didn't have the runs this time.

Feel free to add any other condiments eg onions, scallions, radish etc.

Here's what I did to 1/4 head of WongBok :

1/4 head of Chinese cabbage, washed, microwaved covered for 5 minutes.

3 forelle pears, julianned
1 handful sesame seeds, toasted

To be blended ;
2 cloves garlic, smashed
1 pear, deseeded
1 knob ginger, washed, skinned
3 T red Korean pepper paste
2 T apple vinegar
2 T fish sauce
1 T honey


Drain cabbage. Cool.
Mix paste, sesame seeds and julianned pear.
Starting from the inner most leaf, apply mixture on cabbage.
Do so under the outer most leaf is smeared with paste.
Serve instantly.

I couldn't finish this and its leftover was used to fry rice. That makes another portion of kimchi rice for me.

Never was so satisfied this week :-)

Yam moon cake ( Oh-nee )


Mid Autumn festival is back. The festival of moon cakes, chinese teas, praying to ChangEr by grandma and weight gain.

Gone are the days when I have to buy fancy boxes of predictable moon cakes to impress . The price increase over the years have gone from the ridiculous to the incredible. Who knows when the cakes are made and how much sugar/salt/preservatives have gone into each one ?

But how can we go through Mid Autumn festival without even a single piece of moon cake ?

With so many issues at hand, it's time to roll up my sleeves and get into some serious baking.

Moon cakes with fancy fillings galore are sold all over town and inspired by the myriad combinations, I have come up with a table for filling and skin type. I wring my hands over the kind of moon cake I should bake. Now see the reasons why I agonized over it :


Skin :
Snow skin
Baked short pastry crust
Teochew flaky crust
Skinless


Flavor of filling :
Lotus
Green tea / coffee / mango / any new age ingredients
Yam
Red bean
Dousha
Sweet potato paste
Pumpkin paste
Custard

Condiments :
Melon seeds
Pumpkin seeds
Attap seed
Pine nuts
Poppy seeds
Chopped candied melon
Egg yolk


Now all I should do is link any item from all of the 3 sections or do the 'eeny minnee ' routine to decide a specific combo..

The other 2 members are not hot on mooncake matters so finally I decided on the traditional Teochew crust,yam combo. I should have added chopped melon but well, maybe another time.

Makes 24 yam moon cakes

Yam paste : ( may have excess that can be used for 'yam kaya' on toast ? )
1 small yam, peeled,cubed,steamed and mash by using ricer, net weight 800g
1 cup fine sugar
150 ml oil
1/4 t salt
1/8 t purple color


Ingredients
Water Dough:
230g all-purpose flour
25g icing sugar
70g corn oil
 70g water with a drop of colour

Oil Dough:
175g cake flour
 90g shortening
 2 T oil
 
Steps:
Filling: ( prepared the day before )
Put every thing in a pot and fry on medium heat. Stir with a pair of chopstick until paste pulls away from pot when stirred.
Do a taste test. Check that sugar has dissolved. Turn off heat.
Leave to cool. Set aside.

Water dough:
Sift flour and icing sugar.
In the processor, blitz oil into the flour mixture.
Add water. Blitz to form a soft dough.
Transfer to bowl and rest for 10mins.

Oil dough:
Sift flour into a big bowl.
Transfer flour to processor receptacle.
Use the processor and blitz in the shortening to form a soft dough.

Shaping of dough:

Prepare an oiled, NOT floured, surface.
prepare 24 T of yam balls. I use a measuring spoon to shape them. Easier done when yam paste is chilled.

Divide water dough and oil dough into 12 portions.
Lightly roll water dough into a disc.
Encase the oil dough with the water dough.
Flatten pastry. Roll the pastry into a longish rectangle, gently. Avoid press downwards.
Roll the pastry away from you, just like a swiss roll.
Turn Swiss roll 90 degrees.
Roll again to longish rectangle.
Roll the dough into a Swiss roll, again.
( this is not a typo error. You do it twice )

Neaten ends.
Divide the rolled pastry into 2pcs. It makes 2 tubes.
Let tubes stand on cut surface.
Flatten tube making a round disc. Make the outer edge thinner than middle.
Put 1 portion of filling ( about 1 ice cream scoop ) onto flattened dough and wrap into the pastry.

Seal the opening. Place sealed side down on grease proof paper.
Bake in a preheated oven 180C for about 30 mins.
Remove and cool on a wire rack.

Should you have leftovers, put it under the grill before serving.

Friday, September 10, 2010

Moon cake from the secret baker

What can I say? The secret baker next door did it again! That's a hat trick for her, pulling goodies one after another with narry an effort. All the more impressive when she has a full time job, that lady! I simply can't keep up with her productivity.

Me guess, maybe there are little elves working overnight at her kitchen churning out surprise after surprise.

Now back to what awed me. But be forewarned. The following may cause salivating and spontaneous craving.

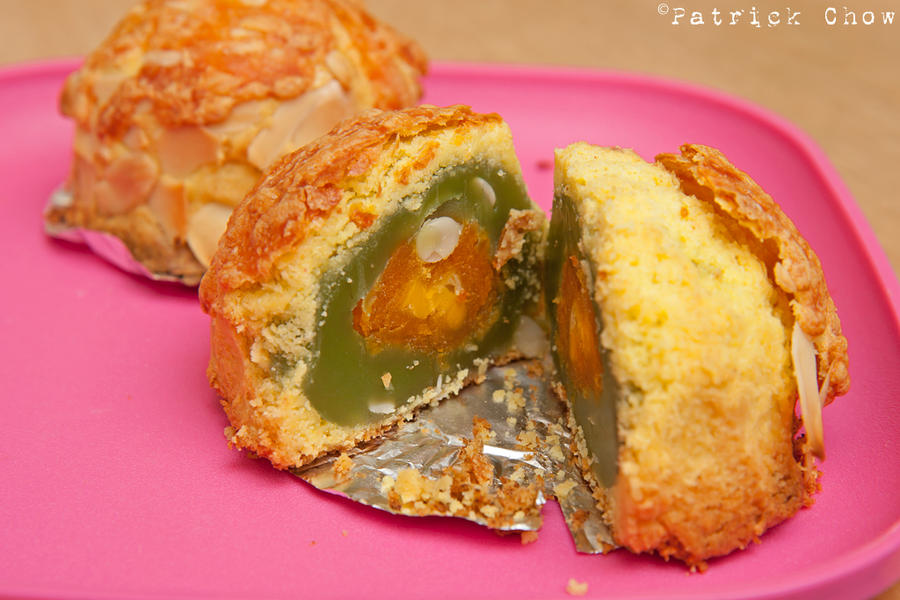
This little nugget is heavy laden with all the stuff cheese loving foodies like me love. Definitely an ultimate fusion, with a mean thin cheese crust encrusted with micron thin almond slivers crowning the buttery flaky moon cake pastry.


And when I thought the excitement is merely skin deep, there appears before me a sunny salted egg yolk, sitting regally in the middle of the jade green lotus paste.

To the untrained eye, one is bound to miss the surprise melon seeds interspersed thoroughly in the lotus paste. The senses go into overdrive as I experienced the crunchy seeds accenting the powdery yolk and creamy paste . This little experience after working from the outside layers of crispy cheese crown and flaky pastry skin left me powerless to pinpoint which sensation I love best.

It really overwhelmed and sent me over the moon, literally. If there is one item I have to bring as a tribute to a suzerain, this is it!

Calzone. Italian pizza foldover


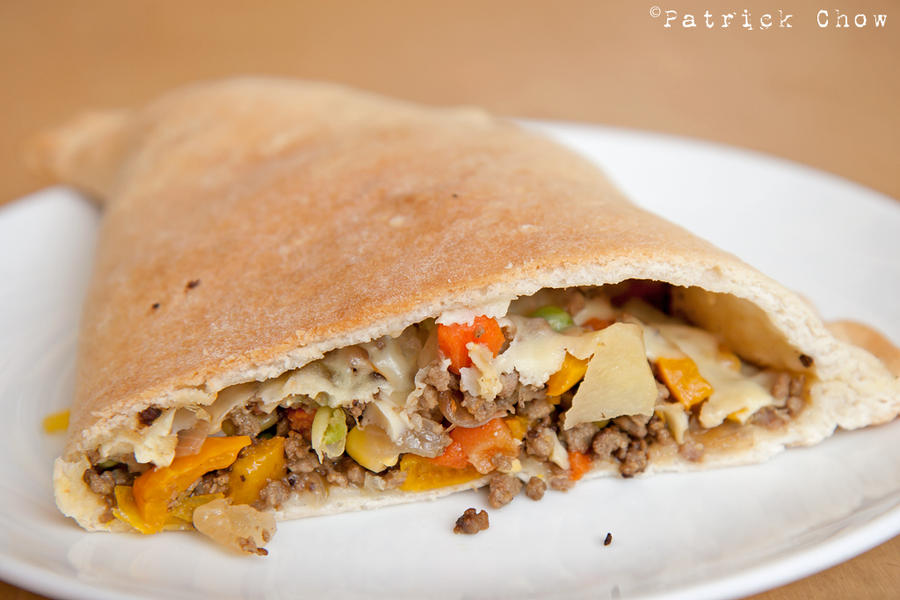
When I first saw this in Rome, I knew that this must be made for the pizza addict who need to have it on the go. Whatever toppings stay snug in a foldover pizza dough, cheese and all. Here, I have the calzone encased with 'dry' bolognaise but my next one will be a dry rendang version, spice and all.

This one here looks a tad dry because I was on a diet which explains the less than enough cheese inside the case. Unfortunately when the cook is on diet, every one else suffers. To do a mind blowing calzone, double the amount of cheese otherwise exercise moderation with the ingredients. Other than the dough, wrap with whatever that makes you happy provided the fillings are not too soggy.

Makes 3 calzones

Dough
1/2 t fine sugar
1 t yeast
110 ml warm water

1/4 t salt
1 1/2 t olive oil
225 g bread flour

Mix sugar,yeast and warm and leave to froth. Discard if this does not happen.

Mix salt and flour with a whisk. Add yeast mix, oil. Knead for 10 minutes. Let it rise for 1 1/2hr

Beef filling :
200g minced beef
cup peas, blanched in salt water
1 yellow pepper, small cubes
3 cups mozarella cheese, shredded, low fat
2 onions, cubed,sauted in olive oil


Retrieve dough, divide to 3 portions. Roll on floured surface until about 1 big handspan in diameter.

Preheat oven to 230 C

Divide filling to 3 portions, spoon into one half of dough. Fold the other half over filling, seal the edges.

Brush surface with olive oil.

Carefully lift to baking pan and bake for 20 mins or till brown.

Thursday, September 9, 2010

Gyoza or pot stickers

I have been wanting to do this because I just can't get enough of the little meat wraps at FengJi. Besides downtown is too far when the guotie craving comes. With the last success at Polish dumpling, I am raring to go. This time, hot water is used to lock in moisture but otherwise it is easy from the word 'go!'

Procedure looks lengthy but the trouble is offset by the fact that it is very therapeutic. Not to mention, a sense of satisfaction too!

Guotie dough :
50g plain flour ( cold dough ) in container 1
200g plain flour ( hot dough ), in container 2

Filling :
1/2 kg pork, minced
1 tab light soy sauce
1 tsp chicken powder
1 tsp pepper
1 tab grated fresh ginger
1 tab sesame oil

For the following procedure, err in the safe side. Add water very slowly in both cases so that the dough does not get too soggy.

Add cold water very slowly into 50g of plain dough, stirring constantly with a fork until crumbly. Knead.

Pour very hot water into 200g of plain flour very slowly, stirring constantly with a fork until the mixture is crumbly. Knead and set aside.

Combine both dough and knead on a floured surface while the hot dough is warm until the dough is no longer sticky but slightly elastic.

Set combined dough aside in a bowl, covered for it to rest for at least 60 minutes. It allows all elements to integrate and will be more pliable later.

Meanwhile, mix ingredients for filling. Chill meat for a couple of hours until ready to use.

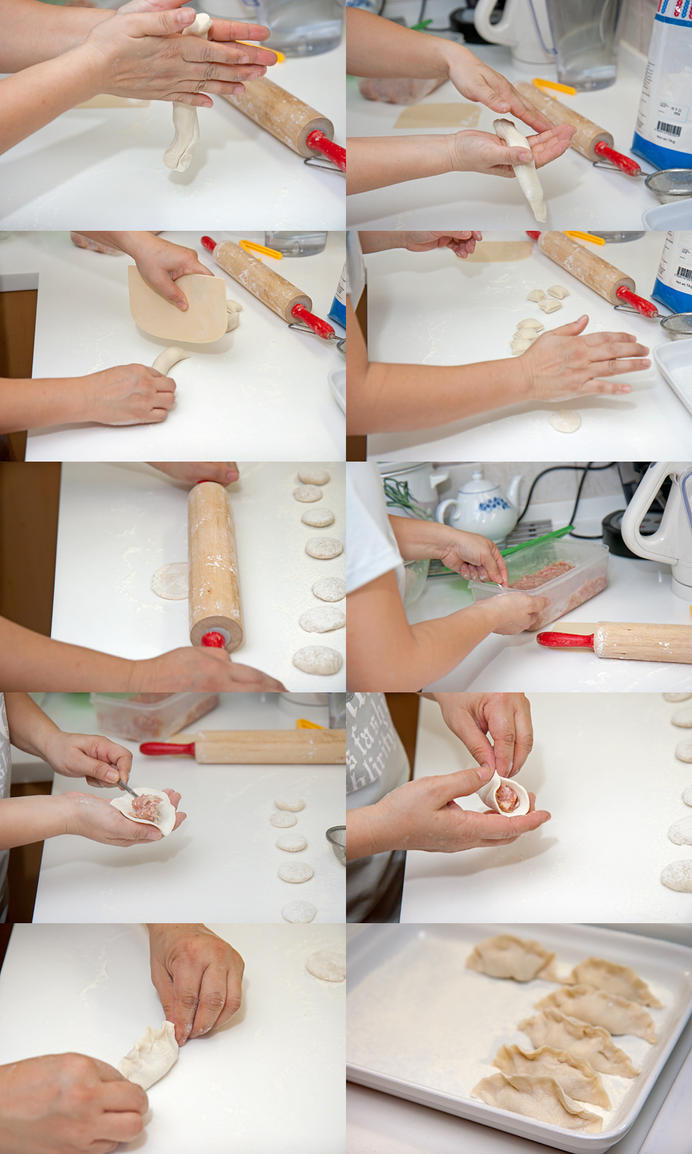
Prepare a floured table top. Retrieve dough from chiller and knead again. Cut small finger sized pieces, roll into a tiny ball and flatten with the flat of the palm. With a rolling pin, roll into a small disc. Do this in batches so that the dough does not dry out. Keep dough that is not ready for use covered.

Scoop 2 tsp of meat onto the dough disc, seal edges. Set aside, covered and chill till it is ready for use.

Heat 2 tab of oil a non stick pan, gently put in the gyoza and fry until the bottom is crispy. Pour stock or water on the gyoza at this stage, cover pan and let steam. When dough looks cooked, remove cover and continue to heat until the pan dries up.

Serve gyozas with shredded ginger and black rice vinegar. For a little culinary snobbery, use the best balsamic vinegar you have and savor the work of your labor.

Tip :
To make a batch for the next day, do the same but freeze gyozas, separated if possible, until ready to cook. This keeps the moisture locked in, the meat fresh and separating them is easier in the frozen state.